Monday, December 30, 2013

Christmas Sugar Cookies with Glaze Icing


Every year our family has a Christmas party with all of my Grandpa's family. His brothers and sisters and all their kids, grandkids, and now even great grandkids, get together to eat, dance, and take tons of pictures. It's such a nice gathering and tradition that we all love. We always make my Grandma's classic cookies (which I'm planning to share soon) and I also made these Christmas shaped sugar cookies.

As you know, I love making cutout cookies so much. I have made many shapes, sizes, and kinds, but the materials are generally the same, sugar cookies + royal icing= decorated sugar cookies. Now I love this formula for making decorated sugar cookies, but I will admit when making a large batch of say, 100 cookies or so, it can be time consuming. And though I do enjoy taking the time to decorate, design, and be creative sometimes you don't have as much time to dedicate to decorating. So here comes the perfect solution for quicker cookie decorating that is still terribly cute. Instead of royal icing or fondant, try this glaze icing. It's so very simple and looks great. It hardens to a stackable point, similar to royal icing, but not quite as stiff. Give it a try next time you are pinched for time or just want to try a new kind of decorating.


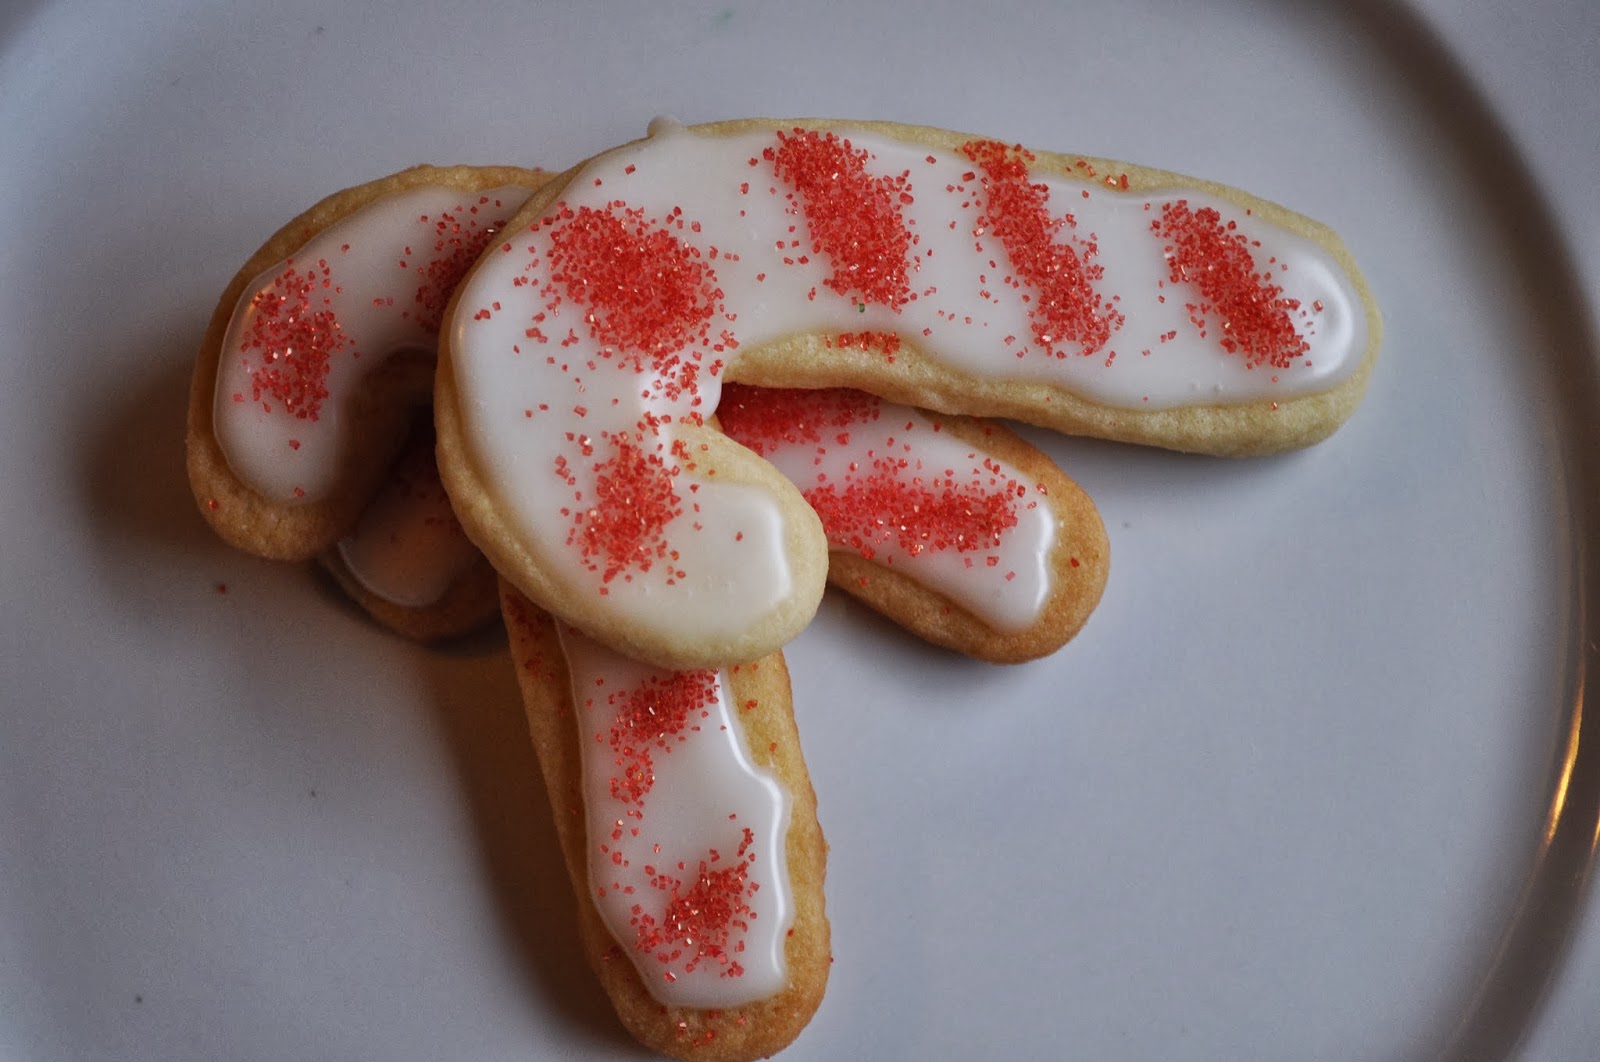
For our What's Baking challenge for December, Jenna from Jenna's Cooking Journey, chose Christmas traditions and there is nothing more Christmas to me and my family than Christmas  family parties and cookies. Enjoy these Christmas cut-out cookies with glaze icing.

Also I know I'm little behind but Merry Christmas to all of you and I hope that 2014 brings many blessings to you!


Cookie Dough:

1 cup sugar
2 sticks butter, cut into cubes
1 egg
2 tsp vanilla
1 tsp almond extract
3 cups flour
2 tsp baking powder
pinch of salt

Glaze:

2 cups powdered sugar
1 tbsp corn syrup
2 tbsp milk or water
1 tsp clear extract (vanilla or almond)
green gel food dye
sprinkles/sugar crystals


1. Cream butter and sugar on high until well mixed. Add in egg and extracts and continue to beat.

2. Slowly add in dry ingredients while mixing. Remember to scrape down sides of the bowl.

3. Knead the dough briefly and roll out on a floured surface. Cut into your desired shape using cookie cutters.

4. Place on parchment lined baking sheets and bake in 350 degree oven for 9-11 minutes, until very slightly golden brown.

5.  Set cookies on racks to cool while making glaze.

6. Mix powdered sugar, corn syrup, and milk in a bowl. If your glaze is too thick, add 1 tsp more milk or water and if it becomes to too thin add some powdered sugar.  (For candy canes and Christmas trees, make one batch regular white glaze and a second batch with green dye)

7. To decorate, put glaze in ziploc or piping bag and cover cookies with glaze and use a utensil to help spread and smooth out glaze. Use festive sprinkles or sugar crystal to decorate if desired. Let glaze set up on baking racks until fully dry and hardened.


Source: Bake at 350 and Baked Bree

Sunday, December 15, 2013

Christmas Peanut Butter Sandwich Cookies on Jersey Bites


Check out this Christmas Peanut Butter Sandwich Cookies I shared over on Jersey Bites. They are peanut butter cookies with a peanut butter buttercream squished in the middle! I used a cookie press insert and sugar crystals to make the design on the cookies. Hope you enjoy these and have a Merry Christmas!!!!

Wednesday, December 11, 2013

Spiced Brown Sugar Cookies- The Great Food Blogger Cookie Swap 2013


The Great Food Blogger Cookie Swap 2013I recently participated in my first ever food blogger cookie swap. I found it from other bloggers who had participated in past years and was thrilled to be a part of this fun event! So basically, everyone makes a huge batch of a favorite cookie recipe to total 3 dozen cookies. These cookies get divided into three packages of one dozen cookies each and then sent to three different people. Therefore each participant gets to receive three packages of cookies from other bloggers! Isn't that a great Christmas treat to surprise you on your doorstep?

I had the joy of getting cookies from three lovely, talented bakers all across the US (literally... Florida, Texas, and Cali) and each one was unique and delicious! Here's a quick peek at what I got in the mail this past week....

First cookie delivery- A medley of Christmas cookies from Laurie at Food is Love. I had the pleasure of enjoying red and green velvet cookies, banana split cookies, and caramel brownie cookies. It was such a nice surprise after a long day to come to these on my doorstep!


Second cookie delivery- Delicious Rugelach from Emily at Totes Delishy. These were my mom's favorite! She tasted them and tried to steal them all! These were waiting for me in the morning so I decided they could count as a special breakfast treat!


Third cookie delivery-  Peanut Butter Cup cookies from Diana at Life Tastes So Good. Peanut butter cups are one of my all time favorite foods so needless to say, I was a big fan of these cookies! They made for a perfect snow day snack!


Now finally onto the cookies I shared for the Great Food Blogger Cookie Swap! I made these spiced brown sugar cookies which were similar to a snickerdoodle mixed with a cinnamon-gingersnap cookie. And they were so good! 


3 cups flour
2 tsp baking powder
1/2 tsp salt
1 tsp cinnamon
1/4 tsp pumpkin pie spice
1/2 cup sugar
1/2 cup brown sugar
2 sticks butter, softened
1 egg
2 tsp vanilla
Green and red sugar crystals


1. Beat butter and sugar on medium speed until light and fluffy. Add in egg and vanilla and continue to beat. 

2. Mix flour, baking powder, cinnamon, pumpkin pie spice, and salt in a separate bowl.  Slowly add dry mix while beating on low.

3. Wrap ball of dough in plastic wrap and refrigerate for 15 minutes. Take out of fridge and roll into balls then flatten with your hand. These cookies retain their shape well.

4. Place on parchment lined sheet and sprinkle with red and green sugar crystals. Bake on 350 degrees for 10 minutes. Allow a few minutes to set on baking sheet and them remove to cool.


Adapted from : Annie's Eats

Tuesday, November 5, 2013

Apple Cupcakes


Good morning! I'm soaking up the last month of my favorite season! I love everything fall! The trees, the leaves, the orchards, the weather, the hoodies, the campfires. It's so fun! And not to mention the  fall themed food that go right along with this season, all things caramel, cinnamon, apple, cider, nutmeg, and pumpkin. It's literally all my favorite things.

So in celebration of my favorite season, I made some fall treats for my husband's work. His coworkers do this tradition called a friendship plate. The staff is divided up into list and each list gets cute dish which the first person must fill with sweet treats and then pass to another person on your list. After you enjoy your treats, you fill up the plate with sweets and pass it on to someone else. By the end of the year everyone has been gifted a dish of goodies. Isn't that so sweet?


In honor of fall I made snickerdoodle blondies, which were heavenly to say the least. Yes, I did try some of the scraps before wrapping up the rest of them and yes, I will post the recipe soon. And I made cupcakes shaped like apples. This is so easy and so cute, I had to share how to make your own apple cupcakes on here. 

 The cupcakes can be homemade, box, whatever. I happened to get a caramel apple box mix on sale for 88 cent last week so I cheated this time. I added cinnamon and caramel extract to help it out. Then choose your favorite icing and simply spread it on evenly to make a nice dome shape. 

Now here's the fun part. Take white sugar and put it in a ziploc bag. Add a few drops of red gel food coloring. Zip the bag and smush! Knead the sugar, toss the sugar. Just keep mixing it until all the dye has been well mixed into the sugar and the sugar is now completely red.  
Then pour the sugar in a small, shallow bowl (I used a coffee cup) and dip the frosted cupcake in upside down, paying attention to fully cover all the icing with red sugar. 

When you are done insert a popsicle and add a green mini m+m for decoration and there you go.


Monday, November 4, 2013

Stuffed Shells


My poor hubby had to have a procedure last week, and any of you who have had one know that you can not eat for 24 hours before most procedures. My husband basically thought this was the end of the world.  "Umm...No food for how long?" was all he could talk about. Gatorade, Italian ice, and broth were not acceptable forms of food for Robert. So he kept "reminding me" me that he would loooove stuffed shells as a reward for going through his difficult time. Well what could I say? Of course, I made him stuffed shells for dinner that night.


1 box large shell pasta
Sauce
1 lb ground beef, cooked and drained
2 lb ricotta cheese
Fresh parsley, chopped
2 eggs
3/4 cup Pecorino or Parmesan cheese
1/2 tbsp salt
1 tbsp pepper
1 lb mozzarella, shredded and divided

1. Boil shells until slightly undercooked, or al dente. Drain and set aside. Don't worry! They will bake in the oven and finish cooking later.

2. Set aside some mozzarella cheese for topping. Stir ground beef into sauce.

3. Mix ricotta, eggs, parsley, most of the mozzarella, pecorino, salt and pepper in a large bowl to blend.
Using a spoon, open the shell and fill with cheese mixture.

4. Pour a tiny bit of sauce to coat bottom of large glass baking pan. Place stuffed shells opening up into baking dish and continue until all shells are filled.

5. Pour sauce over the tray full of shells and top with mozzarella.

6. Bake at 350 degrees for 35-45 minutes. Let cool and enjoy!


Monday, October 28, 2013

Rum Raisin Cinnamon Scones


For the month of October, we were challenged to make scones by Jaida from Sweet Beginnings! I'm a big fan of starbucks cinnamon chip scones so I immediately decided to try to make something like that and they turned out fantastic.  However my husband requested scones with raisins so I combined two recipes to make one awesome scone, rum raisin cinnamon scone! And it turned out delicious!!

Scones:

2 cups flour
3 tbsp brown sugar
2tbsp white sugar
1 tbsp cinnamon
3 tsp baking powder
1/2 tsp salt
1/2 cup butter, cold
2/3 cup whole milk
2 tsp vanilla extract
2 tsp rum
1 egg
1/2 cup raisins

Filling:

1/4 cup brown sugar
1 tsp cinnamon
1 tsp heavy cream, and some more for brushing

Icing:

1 cup powdered sugar
1 tbsp heavy cream
1/2 tsp cinnamon
1 tsp vanilla
1 tsp corn syrup


1. Mix all dry ingredients for scones together in a large bowl.  Cut in cold butter using a pastry cutter or two forks until the mixture resembles course crumbs.

2. Add in extracts, milk, egg, and rum. Mix well. Gently fold in raisins. Pour mixture onto a large piece of wax paper to form a rectangle (about 5 by 10 inches).

3. Mix brown sugar, cinnamon, and heavy cream in a small bowl for filling. Spread across the top of half the scone dough.

4. Using the wax paper, fold the dough in half by putting the dry scone dough over the side with filling. Press dough down sealing in the filling and stretching the dough out into a large 12 by 6 inches rectangle.

5. Using a sharp knife dipped in flour, cut the rectangle into 8 squares and then cut each square diagonally to make 16 triangle scones.

6. Place on parchment lined baking sheet and brush with cream. Bake on 400 degrees for 13-16 mins.

7. While scones cool, make icing by combining all ingredients in a bowl. Drizzle icing over scones and let it set.

Sources: Adapted from Stella B's Kitchen and Created by Diane


Saturday, October 26, 2013

Cinnamon Sugar Topped Banana Raisin Muffins


My husband refuses to eat breakfast in the kitchen like a normal human being, unless it's the weekend. It could have something to do with his crazy long commute. I guess waffles and syrup in the car could lead to some sticky situations...

So therefore I need to have all portable, easy to grab and eat while driving type foods for his breakfast. It does limit many of the classic breakfast foods. Since he's a huge fan of banana bread, I decided to try this muffin variation on classic banana raisin bread, which usually gets sliced and put into individual baggies. It's definitely easier to pop in your mouth while holding a steering wheel. My husband also really loved the cinnamon sugar crusty tops. Hope this makes your breakfast commute a lil easier!


Muffins:

3 Bananas, well-ripened
1 cup of sugar
1/3 cup corn oil
2 eggs
1 1/2 cups flour
1 tsp baking soda
1/2 tsp salt
1 1/2 tsp vanilla
2 tsp cinnamon
1 1/2 cup raisins
2 cups water (for soaking raisins)
1/2 cup walnuts, chopped (optional)

Topping:
3 tbsp butter
3 tsp cinnamon
1/4 cup sugar

1. Heat 2 cups of water in microwave or stove top. Add in raisins and set aside to plump.

2. Mash bananas in a large bowl and add all other ingredients.

3. Remove raisins from water and pat dry. Gently fold raisins into batter.

4. Fill muffin tins, lined with wrappers or greased with cooking spray. Bake at 350 degrees for 20-25 minutes.

5. Melt butter in microwave.  Pour sugar and cinnamon into a separate small bowl.

6. Dip the cooled muffins into the butter and then immediately into cinnamon sugar. Eat hot or cold, either way they are great!


Apple Cinnamon Sangria

Check out this delicious drink full of autumn flavors that I made for a birthday brunch. It is both sweet and full of cinnamon flavor which is perfect combo for the lovely fall weather and colored leaves! It's featured on Jersey Bites along with other fall and Halloween themed treats! 
Enjoy!

Tuesday, October 1, 2013

Bachlorette Party Cookies


I had the pleasure to make some treats for a sweet friend of mine's bachlorette party last weekend. We had a great time getting pampered and massaged, then having a fantastic Italian dinner, a limo ride, and dancing to end the night. For such an occasion as this, I thought lingerie cookies would be perfect! Best wishes to my lovely Krista and her future husband!
 

Thursday, September 12, 2013

Baby Elephant Sugar Cookies

I had the honor of making favors for my cousin's baby shower.
I am so excited to meet this sweet lil boy in a month!
The baby's room theme will be baby elephants so that's what I made for favors. 
Best wishes to Gaby and Vin and lil peanut!

 
Here are the sugar cookie elephants ready to be baked.
 
 
And here is the final product, all wrapped and ready!


Thursday, August 29, 2013

Italian Butter Cookies


As long as I can remember I have had a love for these cookies. It's truly closer to an obsession. Like I could eat a lot of them. Especially the chocolate dipped shells and the sandwich ones! When I was little, my Dad took me to this adorable bakery every Sunday after church and let me get four cookies of my choosing. And every week I got some variation of these cookies! It was my special father-daughter date time with Daddy. We would drive home from church while I munched on the cookies and I would just yap on and on about life while my dad just listened. It's still one of my all time favorite memories. The bakery closed many years ago and last month it was knocked down. But even now when I drive by all I think about is driving home from church with my Dad and my cookies.

So after years of searching and trying out recipes, I found a fantastic recipe which is as close as possible to the cookies from this bakery. They are simple butter cookies that start with an almond paste base. You can find them at almost any bakery in NJ or NY, but I have never mastered them myself until recently. And I have the approval of one of my best friends, who is also addicted to these cookies, and  from everyone at the bridal shower of a close friend, so they were a total hit!


The real difference I learned with other recipes and attempts was whether to use butter or shortening. It ends up the recipe I found uses both, butter and shortening, as well as almond paste to make a great mixture of flavor and texture. This cookie is both crumbly but not too dry and just melts in your mouth. Hope you love these as much as I do!


For this month's What's Baking challenge, Nicole, from Seven ate Nine, choose Italian theme and I was thrilled! Being fully Italian and growing up cooking, eating, and loving all things Italian, this is my favorite challenge yet. So I am here to share the best Italian butter cookie recipe I have found! Mangia!


1 stick butter, softened
1/2 cup shortening
1 cup plus 2 tbsp confectioners' sugar (sifted)
4 egg whites
3 oz almond paste
pinch of salt
1 tsp almond extract
2 tsp vanilla extract
3 1/4 cup flour
1/4 tsp baking powder
1/4 cup cocoa powder (optional)

Optional toppings and decorations:
1 cup bittersweet chocolate, chopped and 1/3 cup heavy cream (for making ganache)
sprinkles
maraschino cherries, drained and cut in half
jams

1. In a mixer with paddle attachment, beat just the almond paste on medium high until it becomes soft. (Wish I had the homemade kind, but I just used the canned one) Then add the butter and shortening and continue to cream them all together. *It is important that the butter is room temp

2. Add in the confectioners' sugar while mixing on medium to incorporate. Scrape down the sides of the bowl.

3. Continue by adding in egg whites and extracts slowly and keep mixing on medium. Scrape down sides of the bowl.


4.  Sift in the dry ingredients (flour, baking powder, and salt) together in the mixer until blended in and stop. If you would like all or part of your dough to be chocolate, add in cocoa powder. I made half of mine chocolate and kept half vanilla.


5. Fit pastry bag with a large star tip and fill with dough. Line baking sheets with parchment paper.
Begin to pipe star, shells,  or fingers. Try to keep your baking sheets with similar shapes to not alter cooking time, because the thicker and bigger cookies will of course bake slightly longer.
*If making star/rosette shapes cookies, you can add a maraschino cherry to the center of each cookie or cover with sprinkles.


6. Bake cookies in 350 degree oven for 12-15 minutes. Remove from sheets and let completely cool on drying racks.

7. Now onto decorating, the fun part! For the star/rosette cookies they were decorated before baking with sprinkles or a cherry. The fingers are traditionally done with either jam or chocolate ganache filling, but feel free to experiment with your own ideas. I used a raspberry preserve in a ziploc bag with a small cut on the tip to fill the vanilla fingers. Just squeeze the jam in the middle of the flat side of the cookie and then place another flat side down on top to make a sandwich. For the chocolate fingers, I used chocolate ganache. It is made my simply heating whipping cream in microwave for approx. 2-3 minutes until hot then pouring over chopped chocolate. Allow it to sit for 4 minutes then stir until smooth and thick. Using a spoon, I spread the ganache in the middle of the finger cookie and top some of the vanilla finger cookies. The shells are simply dipped in the remaining ganache and then sprinkled. Allow all the cookies with ganache to set fully.


My favorites were the vanilla shells with ganache and sprinkles, vanilla fingers with raspberry jam, chocolate fingers
with chocolate ganache, and chocolate rosettes with maraschino cherries. Enjoy! What are your favorite kinds! If you make a variation of this recipe or try new shapes and toppings, please share them! I love to see new inventions of old favorites. My next project, might be cream cheese (cheesecake like) filling.


Source: Woodland Bakery in Chatham, NJ's website